Published September 2021
Brandon Fainstad, MD1, Josephine Cool, MD2
Objectives
- Identify the layers of tissue from the skin to the lung pleura on an ultrasound image.
- Differentiate the presence and absence of pleural ‘lung sliding’ using B-mode (2-dimensional) pleural ultrasound.
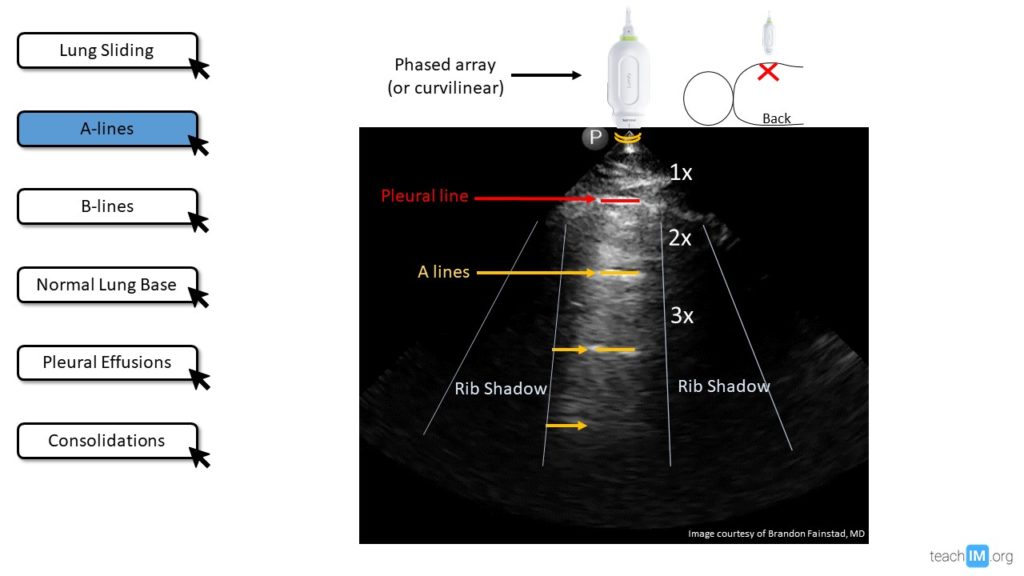
- Identify an ‘A-profile’ on lung ultrasound and describe the ultrasonographic mechanism for the artifact that produces this finding.
- Identify a ‘B-profile’ on lung ultrasound and describe the ultrasonographic mechanism for the artifact that produces this finding.
- Identify a pleural effusion and the five relevant anatomic landmarks using lung ultrasound.
- Identify lung consolidation based on an echogenic pattern similar to the liver (“hepatization”).
Teaching Instructions
Plan to spend at least 30 minutes preparing for this talk. There are three stages to this training experience.
1. Pre-work (see the section below): This is a dense talk that introduces many new concepts. It is important that learners prepare for the talk and enter with basic familiarity with the terminology and concepts. Have the learners watch the three brief introductory videos prior to the teaching session.
2. Present (~25-30 minutes) on the above-listed learning objectives represented by the interactive buttons along the left margin of the PowerPoint. When clicked, each button will reveal an image and a question. Advance through the slide by using the mouse click or arrows on the keyboard. Each advancement of the slide is a prompt to ask a question to the audience. This helps maintains an interactive discussion. You can continue to the subsequent learning objectives (slides) by mouse click or arrows. You can also use the buttons along the left margin to navigate between the different learning objectives (slides)
Objective 1: The transducer should be oriented vertically to cross two ribs with the intercostal space in the center of the screen. Advance through the animations on slide 2 (lung sliding) quiz the audience on which tissue layer is designated by each number/arrow. Skin (1) is most superficial (closest to the transducer), relatively hyperechoic (white) and has a well-organized architecture compared to the Subcutaneous tissue (2). The intercostal muscles (3) are separated from the subQ/pectoralis by a hyperechoic fascial plane and are noticeably contracting during respiration. Ribs (4) will have a superficial hyperechoic cortex as some of the US waves are deflected then a hypoechoic shadow deep to the bony cortex as the bone absorbs all the remaining US waves. The pleura (5) is a thin hyperechoic line deep to the intercostal muscle between two ribs.
Objective 2: To confirm pleural sliding look for any movement or shimmering along the pleura or deep to it during the respiratory cycle. This finding is generated from the parietal and visceral pleura sliding against one another. If there is no visible movement at the pleura or deep to it, then the two pleural are either separated by air (pneumothorax) or they are just not sliding against one another due to inflammation (pleuritis) or scaring (e.g. pleurodesis).
Objective 3: The term “A-profile” refers to more a specific window or region demonstrating a recurring artifact deep to the pleura, called A-lines. These are defined by recurring horizontal lines at equidistance due to the reflection of all (or most) ultrasound waves at the interface of tissue and air. Ultrasound waves are reflected back to the transducer to report how far away (based on time) the tissue-air interface was (call it 1x), then those ultrasound waves are reflected off the transducer back down to the tissue-air interface and again reflected back to the transducer reporting what those ultrasound waves believe to be a tissue-air interface at a distance of 2x. This process repeats itself over and over again, with diminishing signals each time. While it is only an artifact it provides useful information, telling the observer that there is no increased tissue density (alveoli or interstitium) immediately deep to the pleura. There is either air between the visceral and parietal pleura (pneumothorax = no lung sliding with A-lines) or well-aerated lung just deep to a healthy pleura (lung sliding with A-lines). This is why it is key to first assess for lung sliding before interpreting A or B-profiles.
Objective 4: The term “B-profile” refers to the presence of three or more comet-like artifacts that emanate from the pleural line to the bottom of the screen, moving with respirations and obliterating A-lines as they cross over them. B-profile for a hemithorax requires a B-profile in two or more quadrants of that hemithorax.
Objective 5: Ultrasound is a highly accurate tool for diagnosing pleural effusions. When evaluating the gravity-dependent sulcus of the diaphragm, ultrasound can reliably detect volumes of >20cc of free fluid AND can better distinguish between fluid and dense lung tissue compared to the physical exam and chest radiographs. Five structures must be identified:
- Liver/Spleen
- Diaphragm
- Chest wall
- Lung
- Anechoic pleural fluid
This is considerably more sensitive and specific than a physical exam (unlikely to identify effusions <300cc) or a chest radiograph (unlikely to detect <200cc on standard posterior-anterior films).
Objective 6: Aeated lung is not directly visualized by ultrasound due to the reflective properties of air. Thus, if the lung parenchyma is directly visualized this suggests increased density from atelectasis or consolidation. When the lung is densely consolidated the airways remain patent and well visualized, resembling the ultrasonographic appearance of the liver, referred to as “hepatization”. However, a similar appearance is seen in normal, well-aerated lungs, when the transducer footprint is placed directly over the liver. Using the liver as the echogenic window, ultrasound waves travel through the liver, diaphragm, and pleura before being reflected by air in the lung. This recurring reflection produces is referred to as the “Mirror Artifact” an artifact similar to A-lines. “Mirror artifact” can be distinguished from “hepatization” by sliding the transducer superior to the diaphragm or by identifying discontinuation of visible vertebrae superior to the diaphragm.
3. Directly observe hands-on practice with image acquisition, either with learners practicing on each other or willing patient models. The three most common mistakes we observe and recommend focusing on are:
Pre-work
The day before you plan to do in-person POCUS training ask your learners to watch these three 5-minute videos from Core Ultrasound:
Interactive PowerPoint for Presenting
DOWNLOAD FILE and USE DESKTOP APP. Embedded videos will not function properly on the web.
Take Home Points
- Sliding or ‘shimmering’ of the lung pleura suggests the two layers are sliding against one another and rules out a pneumothorax for that specific location.
- A-lines with no lung sliding = air in the pleura or diseased pleura with aerated lung.
- A-lines with normal lung sliding = well-aerated lung just deep to the visceral pleura in that specific window.
- B-lines are reverberation artifacts that represent increased density in the lung alveoli or interstitium and appear as vertical comet-like beams from the pleura to the bottom of the screen and move with respirations.
- A small pleural effusion is best identified by the presence of an anechoic fluid superior to the diaphragm with the patient in an upright or supine position.
- Lung parenchyma directly visualized by ultrasound is due to atelectasis or consolidation, the latter will resemble the appearance of a liver (“hepatization”)
References and Recommneded Readings (hyperlinked)
Baston D. Pocket Guide to POCUS: Point-of-Care Tips for Point-of-Care Ultrasound. 1st edition. Ney York City, NY. McGraw-Hill Education; 2019
Soni NJ. Point of care ultrasound. 2nd edition. ed. St. Louis, MO: Elsevier; 2019.
Miglioranza, M. H., et al. (2017). “Pulmonary congestion evaluated by lung ultrasound predicts decompensation in heart failure outpatients.” International journal of cardiology 240: 271-278.
Mozzini, C., et al. (2018). “Lung ultrasound in internal medicine efficiently drives the management of patients with heart failure and speeds up the discharge time.” Intern Emerg Med 13(1): 27-33.
Touw, H., et al. (2015). “Lung ultrasound: routine practice for the next generation of internists.” Neth J Med 73(3): 100-107.
Lichtenstein, D. A. and G. A. Meziere (2008). “Relevance of lung ultrasound in the diagnosis of acute respiratory failure: the BLUE protocol.” Chest 134(1): 117-125.